ISS Crew Contact Part 3 – Summary of Our Preparations

Nashua Area Radio Society preparations for our upcoming ISS Crew Contact at Hudson Memorial School (HMS) are almost complete. All of our gear is tested and packed, our press release is written, we’ve alterted local news media folks, the students have put together their questions, and have practiced for their contact.

Prioritized ISS Passes for our Crew Contact

We are just awaiting notification of the final date and time for our contact and we’ll begin final setup and testing at HMS.

We’ve been sharing our progress as we’ve on the Nashua Area Radio Society’s Youth Forum as we have worked through our final preparations. I also would like to share a summary here along with some insights on what we’ve learned along the way.

An ISS Crew Contact is No Small Undertaking …

Satellite Station 3.0 Antenna System
Satellite Station 3.0 Antenna System Test

We have been working for almost a year now to get ready for our contact. We’ve built and tested two space ground stations and we’ve discovered and addressed several performance and reliability issues with these stations during trial deployments at Field Day, Ham Fests, License Classes, and during testing here at our QTH.

Space Field Trip at HMS

Dan, AC1EN and the faculty team at HMS have expended a great deal of effort with the students at their school to prepare for our contact. Their activities have included:

  • Leading the ARISS Crew Contact Application Process for our contact
  • Integration of Radio Space Science concepts into their student curriculum
  • A Skype contact with a NASA Engineer
  • Visiting the Boston Museum of Science special exhibit on Space and the International Space Station
  • A High Altitude Balloon Project with the Nashua Area Radio Society to learn about Atmospheric Science and Space Communications
  • Space-related student projects including building rovers, participating in an egg drop, and having their pre-engineering program students work on solutions for the ISS
  • Holding a Field Astronomy and STEM night for students and building Amateur Radio into the school’s annual STEM Nights

Audio-Visual Elements are Important and as Challenging as the Ground Station Equipment…

Sound System Mixer
Sound System Mixer

We planned from the very start to provide a shared, multimedia experience as part of our contact. Our plans included:

  • Providing a professional-quality audio and video experience for the students, parents, and faculty members at HMS during our contact
  • Creating a high-quality Video Capture of our Contact
  • Live Streaming our Contact to Facebook so that more Students, Parents, and the Amateur Radio Community could participate in our contact in real-time

Dave, K1DLM who is a member of NARS had extensive professional sound experience and was able to help us with this part of our project.

Audio System for ISS Contactr
Audio System for ISS Contact

Dave put together a professional-level A-V system design to support our contact and provided much of the gear to realize the design. His uses a pair of communications microphones, a pro-mixer, and audio interface gear to provide student and radio audio to the sound system in the auditorium at HMS as well as to an array of video cameras. The system makes extensive use of XLR cabling and pro-level devices to ensure clean audio.

Video Presence on the Internet is an Important Element to Draw Interest in a Project Such as Ours…

We Live Streamed some of our Station Testing activities to Facebook and we were amazed at the interest and response that we received. Many folks worldwide followed our progress on Facebook in real-time as we set up and completed our full station test.

ISS Antenna Camera Test

We are planning to have two IP Video Cameras Live Streaming to Facebook during our contact. One in the room to provide video of the students as they talk with the astronaut on the ISS and a second on our antennas as they track the ISS.

Its Critically Important to Test the Complete Station Ahead Of Time – New Challenges Emerged when we Mixed Audio and Radio Gear…

Full Station Setup and Test

We set up the full station (Primary and Backup) along with all of the Audio and Video Gear about 3 weeks prior to our contact for a complete system test. We learned a great deal in doing this and we encountered several problems which we have since corrected.

On-Air Station Test
On-Air Station Test

The most important issues did not show themselves until we made some contacts with all of the A-V gear in place. We had problems with RF aggravated ground loops in the radio microphone circuits during the initial test. These problems did not show themselves until we added the audio mixer and sound system into the station.

Audio Isolation Transformer

These problems were easily corrected by adding Audio Isolation Transformers into the radio microphone circuits.

XLR Line to Microphone Level Attenuator

We also solved some potential issues related to level differences between line and microphone audio circuits using Audio Attenuators.

These problems were not difficult to solve but they would have seriously degraded our contact if we had not discovered them early while there was still plenty of time to secure parts and retest.

Data Networks in Schools and Public Places Require Configuration Adjustments to Support Contact Elements…

Data Network Test at HMS

Schools and other public places typically do a good job of protecting their data networks and users from threats from both the Internet and within the venue. Tracking Programs, IP Cameras for Live Streaming, and other contact support gear are not typical devices that would be in operation on such networks. Also, many public venues rely almost exclusively on WiFi for access to the Internet and typically prohibit or severely limit client devices from communicating with each other.

WiFi can often suffer from RF interference issues when many devices like Smart Phones are located together in a small area. This situation is common in large gatherings.

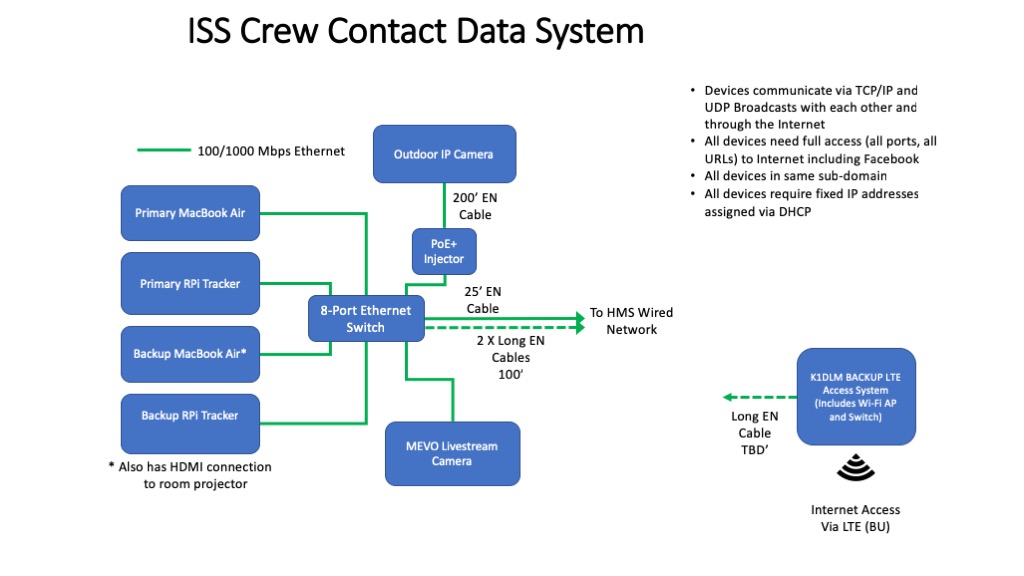
Data System for ISS Contact

Data System for ISS Contact

We had quite a bit of experience with these problems as part of other school projects we’ve done. We worked closely with the IT staff at HMS to plan for and create a network design to support our contact. We opted to use a wired network approach with a local Ethernet switch to implement the IP communications between the elements in our stations and the associated IP Cameras.

The IT team at HMS configured their network to ensure that the IP addresses of our devices were fixed in DHCP and that devices that needed access to the Internet had the access that they required. The IP cameras where the most challenging elements here.

Packed and Ready to Go…

Equipment Packing and Protection

Well, all of our gear is packed and ready to go for setup on-site at HMS. The next article in this series will cover the on-site set up for our contact.

Fred, AB1OC

ISS Crew Contact Part 1 – Ground Station Design and Construction

Satellite 3.0 Station Control Details
Ground Station for Satellites and the ISS

Our planned ISS Crew Contact is almost here! It will take place sometime during the first week of December (December 3rd – 8th) at the Hudson Memorial School (HMS) here in Hudson, NH. I am planning a series of articles here on our blog to explain the process for preparing our ground station(s) and making contact.

The Beginning

Dan Pooler, AC1EN who is a teacher at HMS began this process almost a year ago by reaching out to the Nashua Area Radio Society. Dan wanted to do an ISS Crew Contact at his school and asked if we would help him with the Amateur Radio elements.

We decided early on that we wanted a Direct contact (one which uses an on-site Amateur Radio Ground Station).

ARRIS Ground Station Recommendations

The first thing we did was to look at the ARISS Ground Station requirements document. We learned that we needed to build two Ground Stations – a Primary Station and a Backup Station. These requirements and our interest in Satellite Communications led to the construction of a series of Portable Space Ground Stations.

The Primary Station

The primary station requirements are as follows:

  • Transceiver with 50–100 W output, 1 kHz tuning steps, and 21 memories capable of storing split frequencies
  • Low-loss coax (such as 9913 or LMR-400)
  • Mast mounted receive pre-amplifier
  • 14-element yagi antenna with switchable circular polarity
  • Antenna rotators for azimuth (0–360°) and elevation (0–180°), with an interface for computer control
  • Computer running tracking software for antenna control (including flip mode operation)

The ARISS approach is to use a series of “secret” uplink frequencies which are determined and provided only to the contact operators before each contact. Doppler correction is not required on the 2m band where the crew contacts take place.

Our Portable 2.0 Satellite Station already existed, and it met many of these requirements with a notable exception:

14-element yagi antenna with switchable circular polarity

Satellite Antenna Details
Satellite Station 2.0 Antenna Details

Our 2.0 Station has an 8-element yagi with fixed polarity. This requirement turned out to have a much more significant impact on the design of the Primary Ground Station than just changing the antenna and ultimately led to the construction of our Portable Satellite Station 3.0. More on this in a minute…

The Backup Station

The backup station requirements are as follows:

  • Transceiver with 50–100 W output, 1 kHz tuning steps, and 21 memories capable of storing split frequencies
  • Power amplifier with 100–200W output (optional)
  • Low-loss coax
  • Mast mounted receive pre-amplifier
  • Omnidirectional antenna, either vertical (preferred) or eggbeater style
  • An uninterruptible power source (UPS or battery)

Our Approach

After consulting with the ARISS folks and some thought, we decided to use the then-current Satellite Station 2.0 as the Backup Station and build a new Satellite Station 3.0 for use as the Primary Station. This approach also involved installing a larger rotator to accommodate the larger antenna and a heavier fiberglass cross-boom. The 3.0 station would also receive a more capable antenna for the 70 cm band and add a 23 cm antenna for a third band.

The plan included upgrading the 2.0 Station Antennas to include switchable polarity and the addition of a 200W power amplifier for 2 m to compensate for the reduced gain of the smaller 8-element yagi in the 2.0 station.

Building The Primary Station

Satellite Station 3.0 Antenna System

The construction and testing of the 3.0 Station are well covered in articles on our Blog, so I’ll just share a little information about the final result. The new antenna system used the same ground-based roof tower arrangement that worked well for the 2.0 station. The larger 3.0 antennas are center mounted on a fiberglass cross boom to prevent the Boom from affecting the antenna patterns. We’ve also added a 23 cm loop yagi for a third band. The 3.0 antenna system also uses a more powerful Azimuth-Elevation Rotator from Alfa-Spid.

2m Yagi Switchable Polarity Feedpoint
2m Yagi Switchable Polarity feed point

The new 2 m and 70 cm antennas use relays at their feed point to enable remote switching of the antenna’s polarity between Left-Hand and Right-Hand circular polarity.

Satellite 3.0 Station Radio and Controls

The upgraded 3.0 ground station adds a control console for switching the polarity of the antennas and a custom-built PPT Router Device to manage PTT sequencing of the radio and the pre-amplifiers at the antennas.

Computer Control via MacDoppler

We continue to use the excellent MacDoppler software to control tracking and Doppler correction in the 3.0 Station.

Building The Backup Station

Upgraded 2.0 Antennas

The upgrades to the 2.0 Antenna System involved the installation of Polarity Switching relays in the feed points of the 2.0 antennas. This upgrade was a fairly straightforward one.

Backup Station Radio and Controls Test

The ground station side was more involved as we needed to build a complete second station. I was able to purchase an Icom IC-910H radio used in good condition for this purpose. The rest of the station components were similar to the Primary Station.

Backup Station Test at the Fall Tech Class

We tested the Backup Station at our Fall Technician License Class, and it worked great! several of our class students used the station to make their first satellite contacts.

I am working on adding a 2 m amplifier and improving the PTT sequencing system on the Backup Station, and I plan to post more about these upgrades here in the near future.

Audio System for Our Contact

Mixing Board at HMS
Mixing Board at HMS

Our contact will take place in the auditorium at HMS. The room has a high-quality sound system and a mixing board for audio.

Audio System for ISS Contact

Audio System for ISS Contact

Dave, K1DLM, is part of our ISS Crew Contact Team and has quite a bit of pro-level audio experience. He has put together the following plan for our Audio System. His design allows us to smoothly transfer audio to and from the Primary or the Back Stations. We are also planning to record a video and Livestream video to the N1FD Facebook page during our contact, and his design also supports these elements.

Data System for ISS Contact

The final element in our plan is the Data System. The network at HMS is very tightly controlled from a security point of view, making it difficult to use for contact critical functions like access to up-to-date Keplerian Elements for our straightforward. Dave has an LTE-based Internet Access System that we have used in the past and elected to use to support our stations. We are planning to use the HMS network to transport the Livestream video from our contact. We’ll be using a Mevo Internet Camera for this purpose.

A Million Details…

As you can probably imagine, many details go into making a project like this possible. Here’s a rough timeline of some of the major remaining steps from a Ground Station point of view:

  • Assemble both stations at our QTH with the 2m amplifier and the final 215′ control cables and feed lines – In progress and should be complete in a few days.
  • Full Station Test – add the Audio and Data System components and test the full station at our QTH – Within a week.
  • Configure and Test Data Network Access – for Live Streaming Video and the computers.
  • Set up Ground Station at HMS and perform Dry Run Test – Complete by December 1st.

Dan and the HMS faculty team are also very busy finalizing the student’s questions and handling press-related activities.

We hope our readers will join us via the Livestream video for our contact. We’ll post more on this as we get closer!

Fred, AB1OC

A Portable Satellite Station Part 7 – Plans for a 4.0 Station

Portable Satellite Station 3.0 Antenna System

Satellite Station 3.0 Antenna System

We have begun looking ahead to Satellite Station 4.0 and where we want to go next after our ARISS crew contact is complete. Our goals for the Satellite Station 4.0 include:

  • A permanently installed version of our 3.1 Station which can be operated remotely over the Internet
  • Upgraded Transceivers which add Pan Adapter/Waterfall display capabilities
  • Enhancements to our Transportable 2.1 Station for improved performance
  • A more portable version of our 1.1 Station for Grid Square Activations

New 4.0 Station at our Home QTH

The performance of the 3.1 Station’s antennas is very good but the antenna system is a handful to transport. We are planning to install these antennas on a new tower at our QTH and use our Flex-6700 SDR-based Remote Operating Gateway with some upgrades to create a remotely controlled satellite station that can be operated via the Internet. The main components of the 4.0 Station will include:

The new tower will also provide a new antenna system for the 6m band.

Updated Remote Operating Setup

Flex-6700 SDR-Based Remote Operating Setup

The Flex-6700 SDR and the associated Maestro Remote Unit will enable the 4.0 Station to be remotely operated through the Internet via a Laptop running MacDoppler.

Upgraded Transportable 2.2 Station

Upgrade plans for our Transportable station include the addition of remote switchable polarity relays and a new Icom IC-9700 Transceiver when it becomes available.

Polarity Switch Installed in LEO Pack Antennas

Polarity Switch Installed in LEO Pack Antennas

The polarity switches have been installed on the M2 Antennas 436CP16 and 2MCP8A antennas in our M2 Antennas LEO Pack. We use a DX Engineering EC-4 console to control the antennas’ LHCP or RHCP polarity selection. We have been doing some testing with the upgraded LEO pack, which includes the polarity switching capabilities, and we are seeing a significant improvement in performance.

Alfa Spid Az-El Rotator

AlfaSpid Az-El Rotator

We are also planning to move the upgraded LEO pack antennas to the current 3.1 Tower to take advantage of the AlfaSpid Rotator installed there.

Icom IC-7900 Transceiver

The other major upgrade planned for the 2.2 Station is the new Icom IC-9700 Transceiver when it becomes available. This radio will utilize Icom’s SDR platform and includes a Pan Adapter/Waterfall display which will be a very useful addition for operation with Linear Transponder Satellites.

Upgraded Portable 1.2 Station

We enjoy mountain topping and activating grid squares, so we are planning upgrades to our 1.2 Station for this purpose.

Our 1.2 Portable Satellite Station on Mt. Kearsarge

Our 1.2 Portable Satellite Station on Mt. Kearsarge

The 1.2 Station utilizes computer control to enable operation with linear transponder satellites and will use solar/battery power along with a 100w/70w Icom IC-910H Satellite Transceiver.

Solar Panels

Solar Panels

A pair of 90W foldable solar panels, an MPPT solar charger, and two LiPo 4S4P A123 batteries provide plenty of power to run the IC-910H Transceiver and the associated computer. The portable station also includes a pair of ARR preamps.

Portable Satellite Antenna System

Portable Satellite Antenna System

The antenna system we’ll be using is an Elk Portable Log Periodic 2m/70cm yagi on a camera tripod. Combining a compass and an angle finder gauge helps us correctly point the antenna.

As you can probably tell, all of these upgrades are in progress and at various completion stages. We will post updates here on our Blog as we continue to make progress. Here are links to some of these posts:

Fred, AB1OC

PTT Router for Satellite Station 3.0

ARR Satellite Preamp

Advanced Receiver Research Remote Preamp

Our Satellite Station 2.0 antenna system uses a pair of Advanced Receiver Research Remote preamplifiers at the antennas to boost weak signals. These preamps have RF sensing and switching to protect them during transit. While this system works well; we are always concerned about the impact of the RF power affecting the long-term reliability of these devices and the associated radio equipment.

M2 Antenna Systems S3 Sequencers

M2 Antenna Systems S3 Sequencers

Our Satellite Station 2.0 uses a pair of M2 Antenna Systems S3 Sequencers to control the preamps remotely. For U/V and V/U mode satellites, it’s simple to turn off the uplink band preamp to protect it against RF during transmission. The problem with this approach comes when working satellites and the International Space Station in simplex (single band) modes. In these situations, we need a solution that keys the sequencers externally so that the sequencers can properly control the changeover of the preamps from receive to transmit mode before keying our radio (an Icom IC-9100). We also wanted a solution that could also allow the radio to initiate the keying of the sequencers for CW break-in keying and digital modes.

PTT Router

PTT Router

Our solution was to design and build a simple Push-To-Talk (PTT) router. This device allows an external source, such as a footswitch or a trigger switch, to initiate the keying. The design also includes indicators that confirm that the keying sequence has been completed.

PTT Router Schematic Diagram

PTT Router Schematic Diagram

Our first step was to create a simple design that allowed an external switch or the radio to initiate keying. The PTT source switch (S1) selects the keying source and uses the Hsend  (2m key) and Vsend (70cm/1.2 GH key) lines on the Icom IC-9100 accessory jack as either the means to key the radio or the means to detect that the radio has initiated a transmit keying sequence. A second switch (S2) selects which VFO is keyed when the keying source switch (S1) is in External mode. Finally,  indicators for power and keying complete were added.

Rear Panel Connectors

Rear Panel Connectors

A small enclosure was used to house the switches, indicators, and connections to the rest of our Satellite Station. The image above shows the rear-panel connections to external PTT sources, the S3 Sequencers, the IC-9100 Radio, and a 12 Vdc station power source.

PTT Router Internal View

PTT Router Internal View

A pair of terminal strips were mounted inside the enclosure to make connecting all components easier. The wiring around the front and rear panels is pretty dense, so connections were insulated with heat shrink tubing. A small PCB could easily be created to make replicating the prototype easier should we build more copies of the design.

Satellite Station 3.0 Controls

Satellite Station 3.0 Controls

Our new PTT router was easy to integrate into our Satellite Station 3.0 setup. Integration required custom cables to connect our PTT router to the sequencers and the accessory jack of the radio. With the integration completed, we are now able to properly sequence the control of the preamps and the radio in all modes of operation. Here are some more articles which include more about our portable satellite stations –

Fred, AB1OC

An 80m Broadband Matching System

Our Tower with 75m Loop

Our Tower with 75m Loop

We installed a 75m loop for SSB operation on our tower when we built it. The loop is full size and is diamond shaped so that our lower SteppIR DB36 yagi can rotate inside of it. The loop is fed at the bottom corner about 20 ft up from the ground. It works great for SSB operation on 75m, but we have often wished we could use it across the entire 80m Band. This goal led to a project to create a matching system for the antenna. The idea was to use a set of loading coils in series at the feed point to create a good match in all segments of the 80m band.

EZ-NEC Model for 75m Loop

EZ-NEC Model for 75m Loop

The first step in designing our 80m matching system was to build a model of our current loop using EZ-NEC. The model was then used to determine the correct values of a set of series loading inductors to match different segments of the 80m band.

Matching System Design Analysis

Matching System Design Analysis

We also considered how likely different segments of the 80m band were to be used by profiling historical spotting data from DXSummit. All of this analysis led to the creation of a final design which is captured in the spreadsheet shown above. The final design requires our current 75m loop to be shortened to work well at the very top of the 80m Band.

Modeled Loading Coil Inductance Values

Modeled Loading Coil Inductance Values

A set of 5 different inductor pairs can be used in series with the loop’s feed point to create a good match across the 80m band. The modeled values for the series-matching inductors are shown above.

Matching System Modeled SWR

Matching System Modeled SWR

Our microHAM control system can easily implement the switching of the various inductance values based on the frequency that a radio using the antenna is tuned to. The resulting modeled SWR for the final 80m loop and match combination is shown above. The design should achieve an SWR < 1.5:1 across the entire 80m Band except for the very top, where the SWR remains < 2:1. Also, the design optimizes the system’s SWR in the important CW DX, SSB DX, and Digital windows on the 80m band.

Layout of Components in Enclosure

The layout of Components in Enclosure

With the design completed, we chose an enclosure and all components. Here are the details of what we used:

The first step in the construction was to lay out all of the components in the enclosure. Attention was paid to keeping the two series inductors at right angles to avoid coupling and to keep RF connections as short as possible. The relays were arranged to keep the leads connecting to the coils of roughly equal length. Finally, the control circuitry was kept as far removed from the RF leads as possible.

Enclosure Mounting Ears and Clamps

Enclosure Mounting Ears and Clamps

The matching system attaches to a tower leg via saddle clamps. We fabricated a set of mounting ears and spacer blocks to position the enclosure far enough away from the tower so that the antenna connections do not interact with the tower.

80m Matching System Construction

80m Matching System Construction

A summary of the completed matching system construction is shown above. The design uses a set of four double-pole double-throw relays to switch in different coil taps, which selects the loading inductance provided by the matching system.

We did a set of calculations and found that our relays would be subjected to a worst-case peak-peak voltage of about 2.1 KVp-p at the coil tap points.

The relays are arranged such that two sets of contacts have to be traversed to select any given coil tap. The relays we are using have a third pole which we are not using. We disassembled each relay and removed the internal contact wiring for the center pole, which improves both the coil-to-contact voltage rating and the isolation values of the relays.

These steps combine to improve the voltage rating of the system. This is an important design element given that the match will operate at legal limit power.

Completed RF Deck

Completed RF Deck

The completed RF deck and control circuitry is shown above. The enclosure we chose came with a removable plastic plate that made mounting and wiring all of the components simple.

Loading Coil Mounting and Taps

Loading Coil Mounting and Taps

The loading inductors are mounted using nylon hardware with the ends connected to the two antenna terminals on the sides of the enclosure. The coils use movable tap clips to allow us to fine-tune the match once the system is installed with the antenna on our tower. The initial clip locations are set to create the inductance values modeled during the design phase.

Relay Control Circuit Connections

Relay Control Circuit Connections

The relay control leads use twisted pair wiring to minimize RF pickup. The control leads are routed away from the RF connections to minimize potential RF coupling.

Relay Control Circuit Details

Relay Control Circuit Details

The control circuits for each relay use a combination of a Diode, a Varistor (MOV), and a filter capacitor in parallel to avoid relay coil switching interference and to suppress control line noise.

1.5 to 1 Matching Balun

1.5 to 1 Matching Balun

The matching system is designed to operate at 75 ohms which is close to the resonant impedance of our 75m loop. The current antenna uses a 1.5:1 Balun to match the loop to our 50-ohm coax feedline. We disassembled an identical matching balun (actually a 75-ohm balun plus a 1.5:1 unun) and used it without its enclosure to create a final 50-ohm match.

MicroHAM Setup to Control 80m Matching System

MicroHAM Setup to Control 80m Matching System

The final step in constructing our matching system was to program our microHAM antenna switching system to properly configure the relays in our matching system. This was quite simple to do using microHAM’s frequency-dependent antenna control capabilities. The microHAM system automatically operates the appropriate relays to create the best possible match as the radio which is using the matching system is tuned across the 80m band.

Unfortunately, we are in the middle of winter here in New England, so I will have to wait for warmer weather to install our new matching system on the tower and make the final adjustments. I am planning another article here when the final integration steps are done to cover the performance of the completed project.

Fred, AB1OC

A Portable Satellite Station Part 5 – Plans for Our 3.0 Station

Satellite Grids Worked

Satellite Grids Worked

We’ve made about 250 contacts with our Portable Satellite Station 2.0 and we have worked 106 grids which should be enough to earn a Satellite VUCC. The picture above shows the grids that we’ve worked via Satellites. We’ve learned a lot about satellite operation and had a great deal of fun in the process!

Portable Satellite Station 2.0 Goals

Portable Satellite Station 2.0 Goals

We’ve met all of our original goals for our 2.0 Station and we’ve used it portable at License Classes, Field Day, and other Amateur Radio Demonstrations. We’ve also shared presentations about our 2.0 Station with Amateur Radio Groups here in the New England area. The question that we get most often about the 2.0 Station is “What are your plans for the Portable Satellite Station 3.0”?

Portable Satellite Station 3.0 Goals

Portable Satellite Station 3.0 Goals

Well, here is the plan. We are working with a local group to secure and host an ISS Crew contact. The ARISS folks have published ground station requirements for these contacts. Here are the primary station requirements:

  • Transceiver with 50–100 W output, 1 kHz tuning steps, and 21 memories capable of storing split frequencies
  • Low-loss coax (such as 9913 or LMR-400)
  • Mast-mounted receive pre-amplifier
  • 14-element yagi antenna with switched circular polarity
  • Antenna rotators for azimuth (0–360°) and elevation (0–180°), with an interface for computer control
  • Computer running tracking software for antenna control (including flip mode operation)

Fortunately, our 2.0 Station meets or exceeds almost all of the primary station requirements with the exception of the antennas. The required antenna upgrades will shape the plans for our Portable Satellite Station 3.0.

M2 Antenna Systems 2MCP14

M2 Antenna Systems 2MCP14

ISS Crew Contacts are conducted using 2m Simplex radios on the ISS. We choose the 14-element circularly polarized 2MCP14 yagi from M2 Antenna Systems to meet the ARISS requirements for 2m. Here are the specifications for this antenna:

2MCP14 Antenna Specifications

2MCP14 Antenna Specifications

The 2MCP14 antenna offers a good balance between gain (12.34 dBi) and boom length (10′-6″) and is near the size limit that is practical for use in our Portable Station. This antenna provides an additional 3.14 dBi of gain compared to the M2 Antenna Systems 2MCP8A yagi which we are currently using in the 2.0 Station.

M2 Antenna Systems 436CP30

M2 Antenna Systems 436CP30

While not required for an ARISS Crew Contact, we are also going to upgrade the 70cm yagi to a 30-element circularly polarized M2 Antenna Systems 436CP30 yagi. Here are the specifications for this antenna:

436CP30 Antenna Specifications

436CP30 Antenna Specifications

This antenna is a good match for the upgraded 2m yagi. The 436CP30 has a boom length of 9′-9″ and a gain of 15.50 dBi. This antenna will provide an additional 2.2 dBi of gain compared to the M2 Antenna Systems 436CP16 yagi which we are currently using in the 2.0 Station.

Satellite Antennas Setup Portable

Satellite Antennas Setup Portable

The new antennas will require some modifications to our portable antenna system arrangement. They will need to be mounted on a cross-boom near their centers. As a result, a non-conductive fiberglass cross boom will be required to avoid problems with pattern distortion.

FGCB60 Non-Conductive Cross Boom

FGCB60 Non-Conductive Cross Boom

We will be using an M2 Antenna Systems FGCB60 Cross Boom which has removable, non-conductive end sections made from fiberglass material. The removable ends will make it easier to transport the antenna system. We will also need to make a new mast which is 24″ longer than our current one in the 2.0 Station to create the needed ground clearance for the longer antennas.

Alfa Spid Az-El Rotator

Alfa Spid Az-El Rotator

We are also planning to use a larger Alfa Spid Az-El Rotator. This unit will handle the extra weight of the longer yagi antennas and cross boom assembly and is more precise than the Yaesu unit used on the 2.0 station.

PS-2M and PS-70CM Polarity Switches

PS-2M and PS-70CM Polarity Switches

The last piece of the 3.0 Station Antenna upgrade is to add switchable left-hand and right-hand circular polarity. This will be accomplished via M2 Antenna Systems PS-2M and PS-70CM switchable polarity feed point upgrades for the 3.0 yagis.

DXEngineering EC-4 Control Box

DXEngineering EC-4 Control Box

We have a DXEngineering EC-4 Control Box from a previous project and we can use it to control the relays in the Polarity Switches which will be part of the 3.0 Station antennas. The box will allow us to select any combination of left and right-hand circular polarization on the 3.0 Station uplink and downlink antennas.

We should have all of the parts here for the 3.0 upgrade by the end of the year. We’ll post more as the project proceeds. Other articles in the Portable Satellite Station series include:

You may also be interested in the satellite station at our home QTH. You can read more about that here.

Fred, AB1OC

Remote Operating Enhancements

Updated Remote Operating Setup

Updated Remote Operating Setup

As explained in a previous article, we have been working on enhancing our FlexRadio 6700-based Remote Operating Setup to include additional remote control client options, better remote networking via the Internet, and better integration with our microHAM system.

Remote Operating Enhancements

Remote Operating Architecture

Remote Operating Gateway Architecture

This project involved the addition of the following capabilities to our base Remote Operating Setup:

These steps are now complete, and we have some good results to share.

SmartSDR Configuration

SmartSDR V2 Remote Connection

SmartSDR V2 Remote Connection

The first part of the upgrade was to update to SmartSDR V2. This upgrade enables much improved SmartSDR operation over the Internet. Our previous approach, which used a tunneled VPN connection combined with the previous versions of SmartSDR, did not always perform well when used with low-bandwidth or high-latency Internet connections. SmartSDR does much better in this area.

SmartSDR CAT Remote

SmartSDR CAT Remote

DAX Operating Remote

DAX Remote


Both the SmartSDR CAT and the SmartSDR DAX application have been updated to allow software on a PC being used to operate the FlexRadio SDRs over the Internet to gain access to CAT and sound interfaces associated with the radio.

Maestro Operations

FlexRadio Maestro Console

FlexRadio Maestro Console

We also added a Maestro Console to enhance the usability of the SDR radio portion of our Remote Operating Gateway. The Maestro is very easy to use and extends the available controls and display space which was limited when using just a laptop PC. The Maestro supports direct microphone connections for phone operation and also works with connected CW paddles for operation in CW mode. I have been using a single-level paddle along with our Maestro at speeds of 22 WPM with full QSK. Sending CW at these speeds with the Maestro works well.

The Maestro has built-in WiFi and Ethernet connections and full support for SmartSDR V2’s connections over the Internet. The Maestro can operate from AC power or from an internal battery pack. I have a couple of spare rechargeable batteries for our Maestro to support longer operating sessions on the battery.

Remote Operation using TeamViewer

TeamViewer VPN

TeamViewer VPN

We have been using a combination of TeamViewer Remote Control software and a router-based VPN solution to enable control of our antenna controllers and station power/amplifiers. This arrangement works well, but most of our readers probably do not have a router to support VPN connections or the networking knowledge to set up a secure VPN system.

Using TeamViewer’s built-in VPN capability, a much simpler VPN solution can be realized. You simply install TeamViewer on a PC in your shack that can access your station accessories and on your remote-operating laptop or PC. You then enable TeamViewer’s VPN option, and the configuration is complete.

TeamViewer VPN Connection

TeamViewer VPN Connection

We now use TeamViewer to set up both a VPN connection and a remote desktop control connection to a computer in our shack which can control amplifiers, power, and other station accessories associated with our Remote Operating Gateway. We use TeamViewer in this way to control our microHAM Station Master Deluxe antenna controllers, RigRunner remote power controller, a microBit Webswitch device, and an Elecraft KPA500 amplifier which are all part of our station’s Remote Operating Gateway.

DXLab Operating Remote

DXLab Operating Remote

With the addition of the SmartSDR and the updated TeamViewer/VPN setup, we can operate our station remotely over the Internet. We have tested our setup using a Wireless Hotspot modem and Verizon’s LTE service. The combination of our PC running the DXLab Logging Suite and the Maestro work great in this configuration.

Startup Sequence

We have found the need to initialize the networking configuration in a specific order to get everything running correctly. The steps that we use are as follows:

  1. Connect the laptop PC to the Internet
  2. Bring up the TeamViewer VPN connection
  3. Run SmartSDR on the laptop PC and log in to SmartSDR Remote
  4. Bring up the DXLab’s Suite, including Commander (currently, DXLab’s Commander has some issues connecting when the FlexRadio protocol is used. We have found that the KENWOOD protocol works fine.)
  5. Bring up the remote control application for the Elecraft amplifier and access our RigRunner power controller and microBit Webswitch units to turn on accessories as needed.
  6. Initiate a second TeamViewer Remote Control connection and use it to run the microHAM remote antenna controller in a single window
  7. Shut down SmartSDR on the laptop PC and bring up the connection to the radio via the Maestro.

There is obviously still some room for simplification in this initialization procedure. I expect some simplification as all the software involved becomes more mature and is further adapted for remote operation.

Once initialized properly, it’s simple to use the PC and Maestro combination to work SSB Phone or CW contacts. The DXLab Logging Suite will follow the radio and track modes, handle split operation, and allow control of our antenna rotators via DXView. We can click on spots in DXLab’s SpotCollector to automatically set the FlexRadio SDR’s mode, frequency, and split configuration. The Maestro and DXLab will stay in sync during tuning, mode changes, and other radio operations.

Remote Operation with WSJT-X

Remote Digital Operation using WSJT-X and FT8

Remote Digital Operation using WSJT-X and FT8

The final part of this project was to add the latest version of the WSJT-X software to our Remote Operating client laptop PC to enable FT8 operation on the HF bands and MSK144 for Meteor Scatter work on 6m.

SmartSDR and JTAlert Supporting Remote FT8 Mode

SmartSDR and JTAlert Supporting Remote FT8 Mode

We do not use the Maestro for digital operations. Instead, SmartSDR running on our remote laptop PC is used. We also use the JTAlert application to create an automated bridge between WXJT-X and the DXLab Logging Suite.

The combination of SmartSDR V2 and WSJT-X works great remotely. We have used this combination to make quite a few FT8 contacts on the HF bands and several Meteor Scatter contacts on 6m using MSK144 mode.

These enhancements to our Remote Operating Gateway have helped Anita and me operate more. I have our Maestro in my home office or on a table in our kitchen, where we can listen to the bands and work DX when the opportunities come up. Remote Operating, even if it’s just from another room at your QTH, is great fun!

Additional Planned Enhancements

In the near future, we should be able to begin the next step in our station upgrade plans – the addition of an Elecraft KPA1500 shared amplifier. The new amplifier will enable our Remote Operating Gateway to operate at 1500w on the HF bands and 6m.

This project has turned out to be somewhat involved, so we will be providing a series of articles to explain what we did:

Fred, AB1OC

Plans for 2017 Station Upgrades – Radio, Shared Amplifier, and Remote Op Enhancements

Flex-6700 Software Defined Radio Stack

Current Flex-6700 Remote Operating Gateway and Icom IC-7600 Transceiver

We have several station upgrades planned for this fall. Our planned upgrades include the following:

We always begin our station projects by updating our station design documents.

Remote Operating Architecture

Updated Remote Operating Gateway Architecture

Our Remote Operating enhancements will include the following:

The figure above shows an updated architecture for our Remote Operating Gateway, including these enhancements. The planned Elecraft KPA1500 solid-state amplifier will simplify the software associated with remotely controlling and monitoring the amplifier, tuner, and wattmeter components in our previous remote operating setup.

Icom IC-7610 SDR-Based Transceiver

Icom IC-7610 SDR-Based Transceiver

We have been quite impressed with the performance of our Icom IC-7300’s radio receiver. As a result, we have decided to upgrade the second radio in Anita’s operating position to an Icom IC-7610. We expect the IC-7610’s receiver performance to be as good as or better than the IC-7300.

Icom IC-7610 External Display

Icom IC-7610 External Display

The Icom IC-7610 also provides a nice external display capability, allowing us to take advantage of the radio’s pan adapter. We believe that the IC-7610 will integrate easily into our microHAM system. It should be a “drop-in” replacement for our current IC-7600. We hope to see the IC-7610 shipping before the end of this year.

Elecraft KPA1500 Legal Limit Solid State Amplifier

Elecraft KPA1500 Legal Limit Solid State Amplifier

Our final upgrade will be to add an Elecraft KPA1500 Solid State Amplifier. This amplifier provides 1500 watts on all bands 160m – 6m. The new amplifier will bring up the Icom IC-7610 and our FlexRadio SDR-Based Remote Operating Gateway to full legal limit power. This will be especially helpful on the 6m band where both the IC-7610’s and the FlexRadio 6700’s excellent receiver performance will help us to take the best advantage of the extra power for Meteor Scatter and other weak signal work on 6m.

microHam Shared Amplifier

microHAM KPA1500 Shared Amplifier Design

Our microHAM Station Automation System can accommodate shared amplifiers. We will utilize this capability when integrating the Elecraft KPA1500 into our station. The shared amplifier setup will also allow us to eliminate one of our bandpass filters. The KPA1500 amplifier integrates autotuner and wattmeter functions into the amplifier and provides a direct Ethernet interface for remote control and management. These enhancements should eliminate the need for several remote control server software applications we are currently running on a PC in our shack. Also, we can manage all of these functions from a single client application on a remote client PC. These simplifications will make our remote operating gateway setup more reliable and easier to use.

FlexRadio Maestro Control Console

FlexRadio Maestro Control Console

We plan to share more on these projects in future posts here on our Blog. The FlexRadio Maestro and all the other components we need for Remote Operating Gateway enhancements have arrived. We will complete this part of our project in the very near future and post more here.

Also, the local control interface to the new Elecraft KPA1500 amplifier appears nearly identical to that used by our current Elecraft KPA500 Amplifier. This means that we can begin our shared amplifier upgrades using the KPA500. We do not have a firm date for the IC-7610 to ship, and that portion of our upgrade plans is likely to be our last step in the project.

Special thanks to Dave, K1DLM, who has helped us with ideas for several aspects of this project.

Fred, AB1OC

Portable Satellite Station Design and Operation

Building and Operating a Portable Satellite Station Presentation

Portable Satellite Station Design and Operation Presentation

Anita and I attended the New England Regional Hamvention this past weekend. We gave a presentation on Portable Satellite Station Design & Operation there. You can view a copy of our presentation here.

Satellite Station Portable - Radio and Supporting Equipment

Portable Satellite Station 2.0 at a Recent License Training Class

The Videos from our presentation are below –


We did two additional talks about the Nashua Area Radio Club’s activities, including one on our High-Altitude Balloon Project. You can view those presentations here.

Also, we are planning to have our 2.0 Portable Satellite Station setup at the Nashua Area Radio Club’s upcoming Technician License Class on Sept. 30 – Oct. 1. If you are in the area and would like to see the station in operation, please contact us at activities@n1fd.org to arrange for a visit. You can do that here if you’d like to register for one of our license classes.

Fred, AB1OC

Portable 6m Station for SOTA and Contesting

Fred, AB1OC and Curtis, N1CMD Operating

Fred, AB1OC and Curtis, N1CMD Operating

I got really excited when Jamey, KC1ENX set our Club’s first Summits On The Air (SOTA)/Parks On The Air (POTA) activation for the same day as the June VHF Contest! Jamey chose Pack Monadnock in Miller State Park here in New Hampshire as the site for our activation. With Jamey’s help, we prepared a portable 6m station for the activation.

Solar Panels

Solar Panels

The idea was to use an IC-7300 to create a 100W station and a Solar/Battery combination to power the setup. Solar/Battery made us “legal” as a SOTA activation. We combined two 90W solar panels, which I had with an MPPT solar charging system and two LiPo batteries, to create the power system for the activation.

6M Antenna Going Up

6M Antenna Going Up

The antenna system was built around an M2 Antenna Systems 6M3 Yagi and an 18 ft. push-up mast from Max-gain systems.

Portable 6M Antenna

Portable 6M Antenna

All this gear was carried to the site and set up in about an hour. A 25 ft. section of LMR-400UF coax completed the station. The mast was guyed with rings, allowing us to turn the mast/antenna combination to point the Yagi in any direction.

Anita, AB1QB and Curtis, N1CMD Operating in the June VHF Contest

Anita, AB1QB and Curtis, N1CMD Operating in the June VHF Contest

Between the SOTA/POTA activation and the June VHF contest, we made over 130 contacts on 6m. We did not have any real Es openings, so most of our contacts were regional. The elevation provided on Pack Monadnock made us quite loud for the stations that could hear us. Several of our club members got on 6M and joined the fun. We did have a brief Es opening and managed to work a station in Alabama and one in Florida.

Mike, AB1YK Portable 6M

Mike, AB1YK Portable 6M

Mike, AB1YK has a much more portable 6m setup and uses lower power to have some fun on 6M.

Al, KC1FOZ and Tom, KC1GGP Operating Portable

Al, KC1FOZ and Tom, KC1GGP Operating Portable

Al, KC1FOZ, and Tom, KC1GGP, put together a nice station and operated it using battery power. Several other club members came out with portable stations as well.

Our first SOTA/POTA activation was a lot of fun, and Anita and I are looking forward to the next one!

Fred, AB1OC